Passport Photo Rejected on Passport Seva? Causes and 5 Practical Fixes
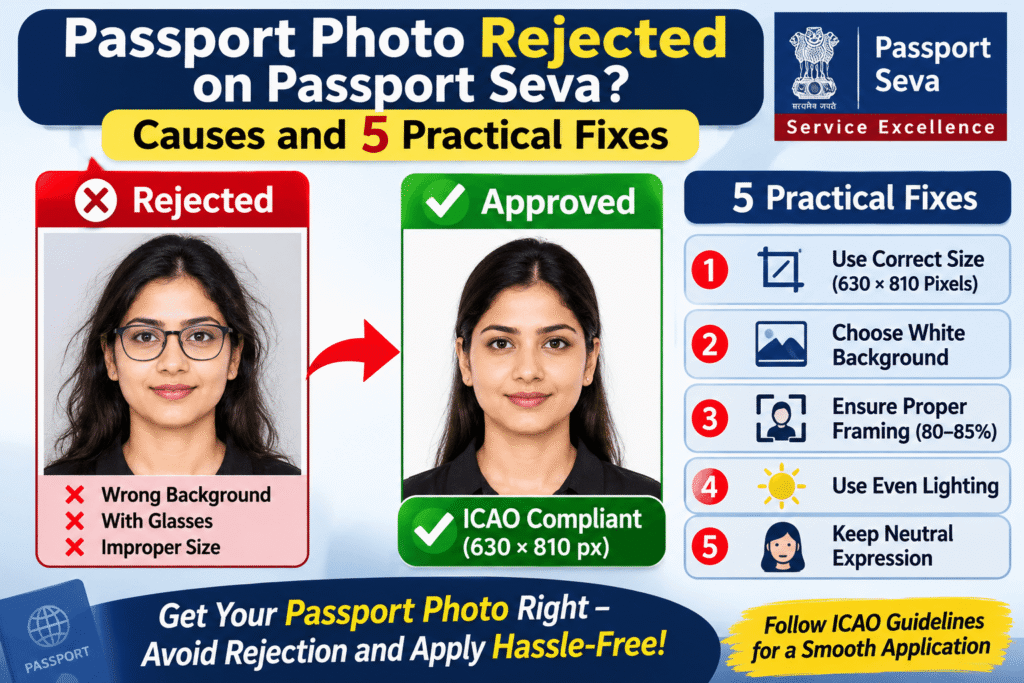
Fix common Passport Seva photo rejection problems with correct size, white background, lighting, framing and facial expression.
You’ve filled in the full application, reached the photo upload step, and then received an error or an outright rejection. It’s frustrating, but it’s one of the most common problems Indian passport applicants face, and it can usually be fixed quickly.
Since Passport Seva Programme 2.0 rolled out, applicants must upload a photo that meets ICAO standards, and photos are now screened much more strictly than before. This guide explains why a passport-size photo gets turned down and how to fix it fast. For a broader overview of the standard itself, see icao standard photograph.
Why Does the Passport Seva Portal Reject Passport-Size Photos?
The portal doesn’t reject photos at random. Every rejection traces back to a rule in the ICAO photo guidelines, either a technical requirement (dimensions, file format, file size) or a visual one (lighting, pose, background).
What the Official Rules Require
According to the Ministry of External Affairs guidelines for ICAO-compliant photos, your image should meet these criteria:
- A close-up showing the top of the head and the shoulders, with the face filling about 80 to 85 percent of the frame.
- A colour photograph measuring 630 × 810 pixels.
- A plain white background.
- No alteration using photo-editing software.
- Eyes open and clearly visible, with no hair falling across them.
- Even lighting, with no shadows, flash reflections or red-eye.
- A closed mouth and a natural expression.
- The full head visible, from the top of the hair to the bottom of the chin, and centred in the frame.
- No glasses if they cause reflections. Head coverings are allowed only for religious reasons, and the face must remain fully visible.
Most online resources also recommend keeping the JPEG file under roughly 250 KB. Treat this as a practical limit rather than an official one. The portal also caps the combined size of all uploaded documents at 1 MB.
The Most Common Rejection Reasons
Technical reasons
- Incorrect pixel dimensions, such as a square 600 × 600 image instead of 630 × 810.
- Wrong file format (anything other than JPEG) or a file that’s too large.
- Over-compressed or low-resolution images.
Visual reasons
- A grey, cream, blue or textured background.
- Shadows on the face or behind the head and shoulders.
- A head that’s too large, too small or tilted.
- Smiling, an open mouth or half-closed eyes.
- Glasses glare or red-eye.
- Beauty filters, skin smoothing or portrait-mode blur.
For a detailed breakdown of each fault and whether it can be edited or needs a retake, read our guide to icao standard Passport photo rejected.
5 Ways to Fix a Rejected Passport Photo
1. Resize and Reformat the Image Correctly
Technical errors are the easiest to fix, and you can often correct them using the same image.
What to check
- Dimensions: exactly 630 × 810 pixels, in portrait orientation.
- Format: save as JPEG (.jpg), not PNG, HEIC or PDF.
- File size: keep it under about 250 KB without making the image blurry.
Quick tip
Don’t photograph or scan a printed photo. Start from the original digital image. Crop it to portrait orientation first, then resize it, so the face isn’t stretched.
2. Replace the Background with Plain White
The background is the most common cause of rejection, and it can usually be fixed without retaking the photo.
How to do it
- Use a background-removal tool and fill the area with pure white.
- Make sure no grey outline or halo remains around your hair and shoulders.
- Check that your head’s shadow doesn’t appear on the background.
When to retake instead
If a shadow falls across your face, or the wall behind you is so uneven that editing leaves messy edges, take a new photo against a plain white wall or sheet.
3. Correct the Head Size and Framing
An incorrectly framed head triggers many automatic rejections.
What the frame should look like
- Only the head and the top of the shoulders, with the face filling 80 to 85 percent of the photo.
- The entire head visible, with no cut-off hair or chin.
- The head centred and straight, with the eyes level.
How to fix it
Crop and recentre the original photo before resizing it to 630 × 810. If the original was taken from too far away and the face looks tiny after cropping, retake the photo from about 1.5 metres away, with the camera at eye level.
4. Retake the Photo Properly at Home
Some faults can’t be edited away. These include shadows on the face, a tilted head, a smile, closed or hidden eyes, glasses glare and blur. In these cases, a new photo is the only real fix.
A simple home setup
- Lighting: stand facing a window in daylight so the light falls softly on your face. Avoid direct sun and overhead lights.
- Backdrop: use a plain white wall or white sheet, and stand a little away from it to avoid casting shadows.
- Camera: use the standard photo mode at eye level. Prop up your phone on a stack of books or use a tripod.
- Pose: look straight at the lens, keep your shoulders square, close your mouth and keep a neutral expression.
- Clothing: wear a darker, simple top so you don’t blend into the white background.
For a full step-by-step walkthrough, including how to set up a solo shoot, see our guide to taking an ICAO photo at home.
5. Turn Off Beauty Filters and Check the Photo Before Uploading
Many phones smooth skin, blur backgrounds and sharpen faces by default, even when you haven’t asked them to. The portal can flag these edits as altered photos.
Before you upload
- Turn off beauty, portrait and face-retouch modes.
- Zoom in to 100 percent and confirm the eyes and hair edges look sharp.
- Verify the pixel dimensions, file format and file size in KB.
- Run the photo through a checker, or review it point by point against the checklist above.
Every failed upload counts toward your total attempts. According to the official upload guidelines, the portal allows a limited number of tries (the reference guide mentions a maximum of 12, including the photo and signature). If you use them all, you may need to fill out a fresh application form. Checking carefully before uploading saves time.
Quick Checklist Before You Upload
- JPEG format, 630 × 810 pixels, comfortably under 250 KB.
- Plain white background with no shadows.
- Face covers 80 to 85 percent of the frame, with the head centred and straight.
- Eyes open, mouth closed, neutral expression.
- No glasses glare, flash reflections or red-eye.
- No filters or retouching.
- Taken recently, showing your current appearance.
If you’d rather skip the trial and error, ICAO Standard Photo is a web service that creates passport and visa photos that meet ICAO requirements. It can check your photo against the rules before you submit it.
Frequently Asked Questions
1. Why does the Passport Seva portal keep rejecting my photo even though it looks fine?
A photo can look good to you and still fail an automated check. The usual culprits are incorrect pixel dimensions, a file that’s too large, a faint grey tint or shadow in the background, or phone filters that smoothed your skin. Check the dimensions, file size and background first, then look for shadows and filters.
2. What is the right photo size for the Passport Seva online upload?
The official ICAO guidelines specify a colour photo of 630 × 810 pixels, with the face filling 80 to 85 percent of the frame. Printed photos for the application form are 4.5 cm × 3.5 cm. Some older guides still mention a 2 × 2 inch square photo, which isn’t the format used for today’s online upload.
3. Can I fix a rejected photo, or do I need to take a new one?
It depends on the fault. Background colour, background shadows, cropping and file size or format can usually be fixed by editing the same image. Shadows on the face, a tilted head, a smile, closed eyes, glasses glare, blur and filtered photos require a new photo.
4. Can I wear glasses in my Passport Seva photo?
The official recommendations don’t allow glasses that cause reflections, and they advise removing glasses to avoid the problem. The safest option is to take the photo without them. Head coverings are permitted only for religious reasons, and your face must be fully visible from chin to forehead.
5. How many times can I upload a photo on the Passport Seva portal?
According to the official upload guidelines, you get 12 attempts to upload documents, including the photo and signature. If you exceed this limit, you’ll need to submit a new application form. Prepare and check your photo carefully before each upload.
Final Thoughts
A rejected passport photo delays your application, but it rarely ends it. Identify the exact reason, decide whether to edit or retake the photo, and check the new version against every rule before uploading. Follow the five fixes above and you can get through the photo step without wasting attempts. For a deeper look at every type of fault, see this complete breakdown of icao standard Passport photo rejected reasons.